Windows 8 detection for Analog
Posted by admin in Software Development on July 18, 2014
Not many people still use the original log file analyser, analog, however for the remaining users I’ve just added detection for Windows 8 and 8.1.
Just grab a copy of tree.c and run ‘make’ to recompile.
SQL Server scheduled backup config step by step
Posted by admin in Server Management on March 23, 2013
One of the first tasks having installed a SQL server is to setup a backup process, coming at it from a Linux centric world this is rather different and actually poorly documented on the Microsoft knowledgebase so here’s how to do it.

1. Open SQL Server 2012 Management Studio, this should be on your start menu but if not then check you enabled it by re-running the installer.
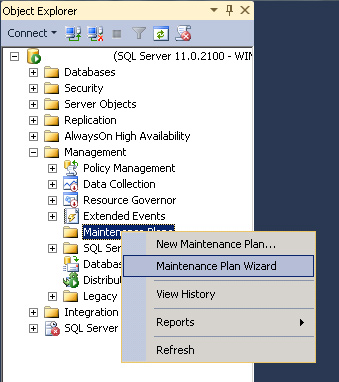
2. Right-click on management -> Maintenance Plans and select Maintenance Plan Wizard
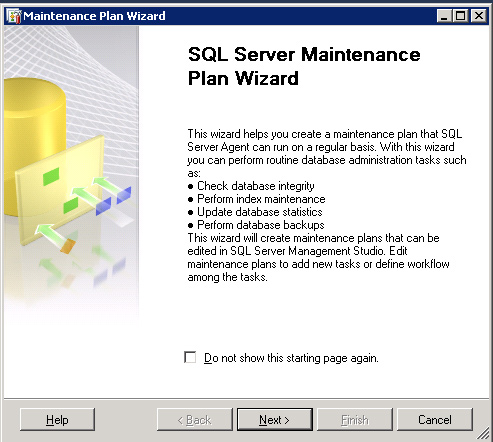
3. This will start the wizard, click next
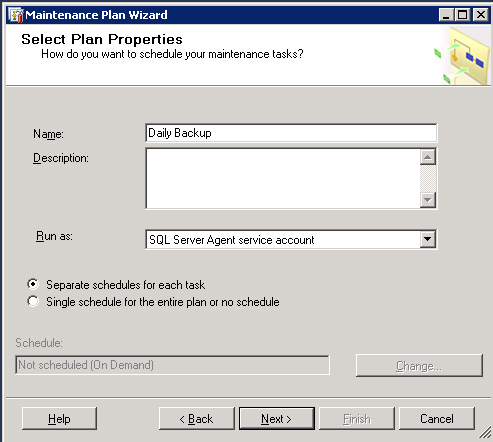
4. Give your ‘plan’ a descriptive name – something you will recognise when you come back to it months or years later, if you only want to perform a backup you can select the schedule (i.e. when to run it) here although I do that later on.
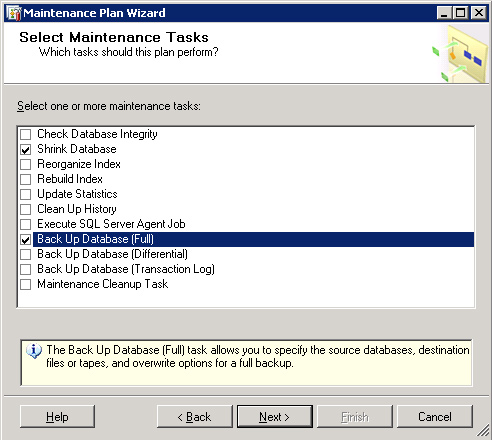
5. You can simply backup the database but if it’s going to be busy, especially with a lot of delete/update queries I’d recommend also having it shrink on a schedule to avoid it growing out of proportion by ticking both boxes. Skip to step 9 if you’re not interested in the shrink process.
6. I prefer to reduce the database size before the backup to keep the backup small although if you don’t trust your hardware you may prefer to have a good backup before you run the shrink in case it hits anything unexpected (although it’s pretty good to be honest).
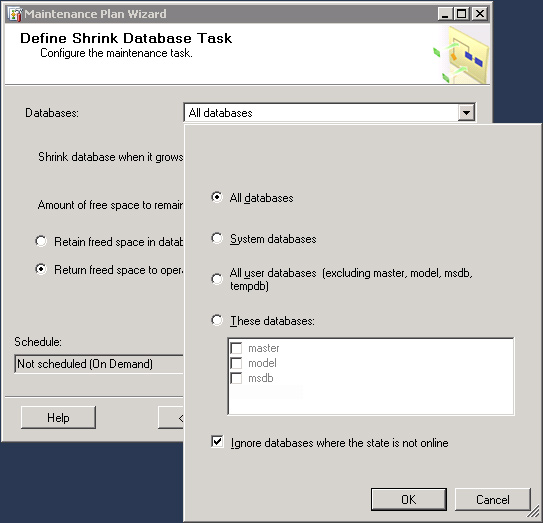
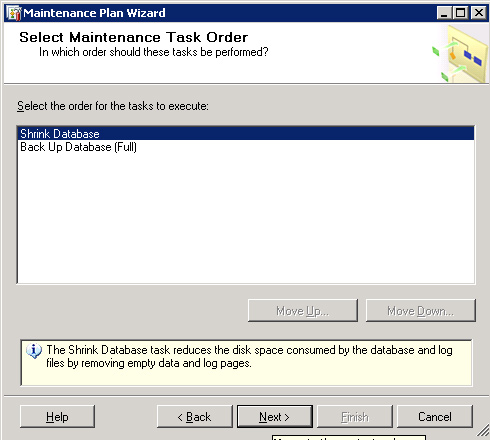
7. I chose to shrink all databases, you can select just specific if you prefer. Behind this you can also select how aggressive you want the shrink to be.
8. This is the most scary looking screen of the process but is quite logical and allows you to set in quite granular means if you desire how and when the shrink should run, once a week is sufficient for my needs.
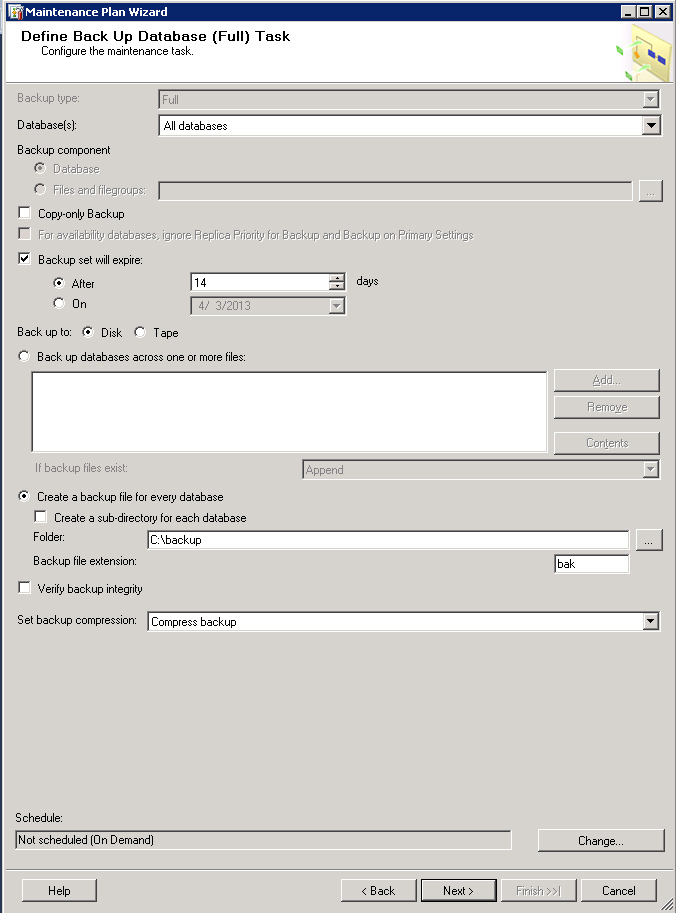
9. Now we’re onto the meat of the matter, backing up SQL databases. I chose a full backup but you may prefer a ‘simple’ backup. For details on the various types see Microsoft’s MSDN article.
I have created a folder, c:\backup to store my backups into, the location is down to personal preference but I don’t like storing data within program files as it is too easy to forget to backup the backups off-site as program files are not normally high importance on a backup strategy.
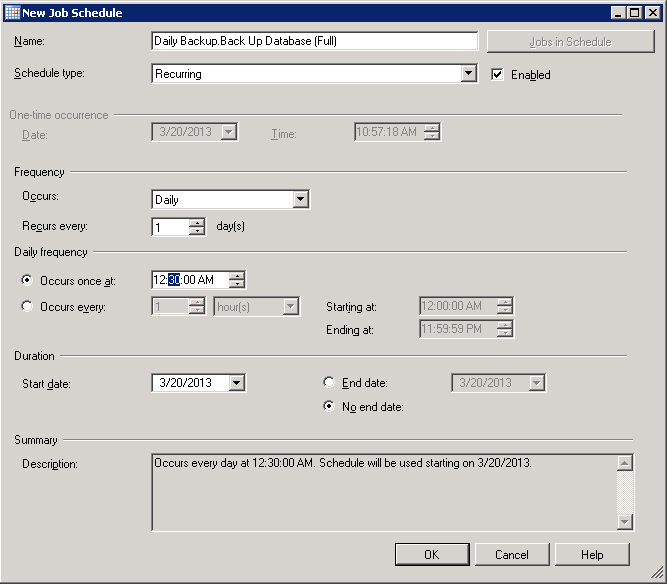
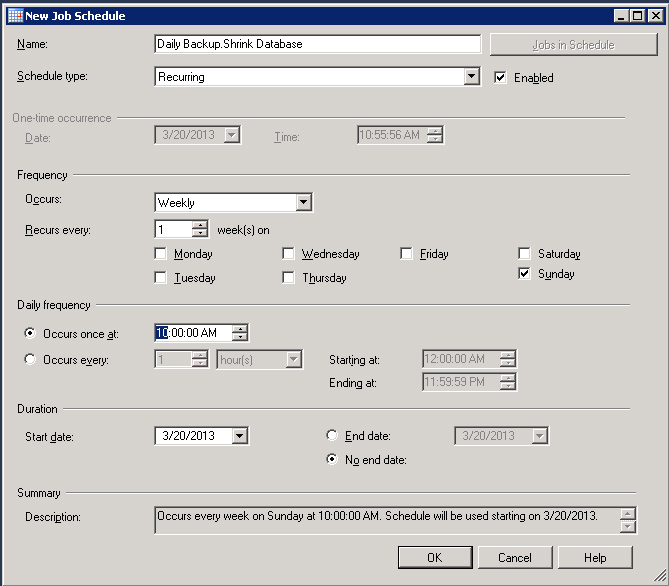
10. Similar to step 8 this allows you to set the schedule for when you want your backup to run, I chose nightly at 00:30 to make sure it was complete before the separate offsite-backup process ran but your needs may vary.
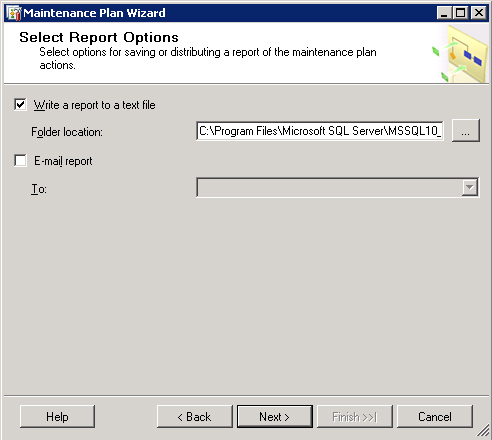
11. Optionally have the process write a log file or email it to you, this is down to personal preference.
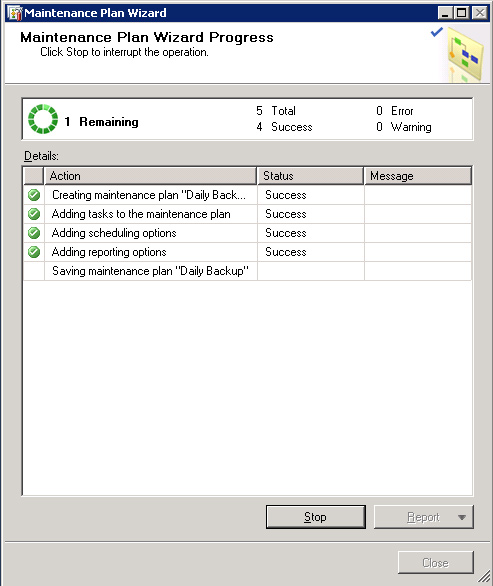
12. The ‘Maintenance Plan Wizard’ is now creating our jobs for us
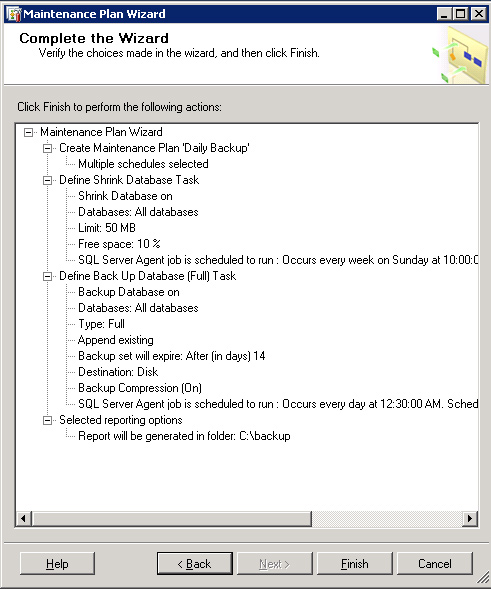
13. Confirmation that the jobs have been created – do review this to make sure that you didn’t miss anything (e.g. it’s easy to overlook the all-important scheduling).
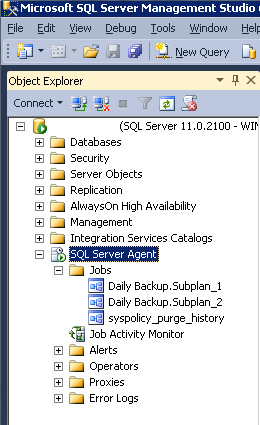
14. You thought you were all done didn’t you… if this is a fresh install then you will most likely find that the SQL Server Agent is disabled by default meaning your maintenance plans won’t run. Personally I think the ‘Maintenance Plan Wizard’ should enable this but it didn’t seem to for me, it is however a simple matter of right-clicking to enable it.
If you’ve followed those steps then you now have SQL Server setup to create a .bak file every night and a shrink maintenance job run ever week.
Don’t forget to include this file in your offsite backups… you do have offsite backups don’t you?
First thoughts on optimising a site for the mobile web
Posted by admin in Web Development on February 7, 2012
Having recently been involved in building an e-commerce website aimed at a mobile audience I thought it would be worthwhile posting a couple of lessons learned from the result.
1.Smaller is better
It really is hard to underestimate the difference it makes to the site, when initially launched although we had used minified javascripts and CSS the pages were not as quick to load as expected. Adding additional compression to the images and enabling gzip output compression (we were using a standard LAMP, Linux, Apache, MySQL, PHP stack so this was trivial to do with mod_gzip) made the pages much snappier and our initial fears about placing an extra load on slow mobile CPUs proved unfounded as well as saving our visitors bandwidth allowances.
2. Don’t get Cached out
When we first launched we experienced a weird phenomenon with images looking distorted on some phones but not others, after much research we discovered that this was not down to the phones but instead the mobile networks and not something we had spotted when testing primarily on Wi-Fi enabled phones. Many of the UK mobile networks perform on-the-fly compression of all images which can result in some nasty compression artefacts. Adding
Header set Cache-Control "no-transform"
to the apache .htaccess (or virtualhost) disables this network compression – you do need to ensure that you are compressing the images as much as possible first – remember, smaller is better.
3. Touch, don’t hover
This is probably an obvious one in hindsight – touch devices make navigation systems with a hover state (or drop-down menu’s) very awkward for the user as many phones don’t offer a hover state. Does make it more challenging when trying to use the best of responsive design principles to enable a site for mobile and desktop viewers however.
4. Pan & Zoom
Mobile devices allow the ability to zoom into an area of content or indeed to zoom out to view a whole page, it is quite possible to build a site which tries to take advantage of media queries or similar to force your visitor to see what you want but in your efforts to show them this are you preventing them seeing what they actually want – basically don’t try to get too clever with your rescaling or you might actually hide the very item they are looking for. When a mobile device zooms in and out the screen size it reports to the JavaScript/CSS engines changes so you can get a mobile device with an apparent screen resolution of well over 1,000 pixels in width yet only poses a 3″ screen and 30 seconds later that same device could report a 200 px wide display – test, test and test again.
5. Getting to Scripts with your tech
There are a number of mobile frameworks such as Sencha Touch or jQuery Mobile, each of these has positive and negative sides and I’m not going to try and compare them here but do some research before you start, they are all rapidly updating and have very structured ways to work which can bite the unwary in unexpected ways – try adding Google Analytics to a jQuery Mobile site by simply pasting the code into the header of your HTML for example can result in very odd behavior due to the way in which the page is built using AJAX.
6. Want some ‘m’ with that?
Many sites have traditionally used m.<domain name> for the mobile content with the main, desktop, site remaining on www.<domain name>, this used to be an excellent way to customise content to the audience however more and more I believe it is misguided and the addition of the ‘request desktop version’ menu item on Android devices which are unable (without some clever server-side detection) to switch from m. to www. confirms this belief, there is also an ever closing gap between the resolutions of phones, tablets and desktop computers and deciding which type of display is most suited to which becomes ever harder – it is possible to detect the display and handle the output via JavaScript or CSS (with media queries) whereas server side code has no native ability to know the screen resolution of the visiting browser.
7. Where am I?
With the advent of mobile geo-IP technology it is quite easy to be drawn into telling users exactly where they are and for some audiences this is highly valuable (e.g. if you’re in a store locator) but many visitors are looking at your site with far more interest in what you can offer online than having any desire to come into your physical shop – respect this and don’t try to force them into giving away their location and/or tell them where they are, it can be really offputting and actually lose you business.
Building an e-commerce site for a mobile audience has been an interesting and fulfilling experience which I intend to work on further, I hope if you’re reading this you will enjoy it also and perhaps learn from some of my mistakes rather than finding them out yourself. If you think there is anything important which I’ve omitted please feel free to add a comment below.
Analog 6 detection for Windows 7
Posted by admin in Software Development on May 24, 2009
analog is a great way to find hard facts from web server log files – no guessing at what is going on just hard facts.
Sadly Stephen Turner, the original author is no longer maintaining this program meaning that it has not detected new versions of operating systems since the release of 6.0 in 2005.
The community and I worked to add detection for Windows Vista after it’s launch and have now added detection for the forthcoming Windows 7 as well as Apple Macintosh OS X.
To make use of this you would need to recompile Analog (detailed instuctions can be found on the analog.cx site, for most Linux installs this is simply a matter of ‘make’ but Windows is a little more involved).
Update 20 Jul 09, now includes detection for Google Chrome browser also.
The updated file you would need to replace is tree.c, this can be found here.
Enjoy